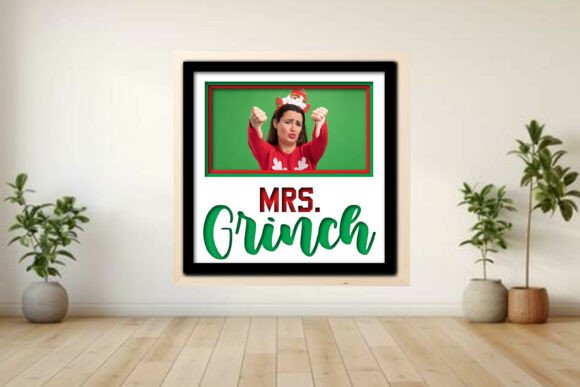
Creating a Daddy Grinch Photo Frame Shadow Box: A Complete Guide to Layered Holiday Decor
The holiday season is synonymous with warmth, nostalgia, and the joy of preserving memories. For crafters and DIY enthusiasts, finding the perfect project that balances creativity with sentimental value can be a challenge. Enter the Daddy Grinch Photo Frame Shadow Box, a charming and innovative design that has taken the laser-cutting community by storm. This project is not merely a decoration; it is a customizable vessel for your most cherished Christmas memories, blending the whimsical character of the Grinch with the heartwarming tradition of family photography.
Whether you are a seasoned operator of a Glowforge®, xTool®, or OMTech machine, or a beginner using a Cricut® or Silhouette® for cutting and scoring, this layered shadow box offers a delightful entry point into advanced papercraft and woodcraft techniques. By understanding the mechanics of layered design and the practical steps involved in assembly, you can create a professional-quality piece of decor that stands out during the holidays.
Understanding the Appeal of Layered Shadow Boxes
At its core, a shadow box is a display case with depth, allowing objects to be arranged in three-dimensional space rather than lying flat against a background. The Daddy Grinch design leverages this concept through a technique known as layering. By stacking multiple sheets of material—typically plywood, cardstock, or acrylic—you create visual depth and separation between elements. This results in a striking 3D effect that draws the eye inward, making the central photograph appear as if it is floating within a festive scene.
The significance of this project lies in its versatility. Unlike standard frames that simply hold a picture, this shadow box tells a story. The "Santa Squad" accents, the stylized tree, and the star elements frame the photo in a narrative context. It transforms a simple snapshot from Christmases past into a curated exhibit. For modern crafters, this represents a shift from passive consumption of decor to active creation, allowing for a personal touch that mass-produced items cannot replicate.
Why Choose the Daddy Grinch Design?
The choice of the Grinch character adds a layer of playful irony and charm. While often depicted as a curmudgeon, the Grinch’s eventual embrace of Christmas spirit resonates with many families. Using this theme allows for a fun, slightly unconventional aesthetic that appeals to both children and adults. Furthermore, the design is engineered for ease of use. It includes color-coded layers that simplify the production process, ensuring that even those new to laser cutting can achieve precise results.
Technical Specifications and File Compatibility
One of the strongest features of this digital download is its broad compatibility. In the world of digital fabrication, file formats can often be a barrier to entry. However, this project includes a comprehensive suite of files designed to work with virtually any cutting or engraving machine on the market.
- SVG and DXF: Ideal for vector-based cutting machines like Cricut® and Silhouette®, as well as most laser cutters. These formats ensure clean lines and scalable graphics.
- PDF and EPS: Useful for viewing designs, printing templates, or importing into graphic design software for further customization.
- PNG: Provides high-resolution raster images, helpful for previewing the design or using in digital mockups.
- LBRN2: A specific project file for LightBurn users, pre-configured with settings to streamline the workflow.
This multi-format approach ensures that whether you are using a high-powered CO2 laser or a desktop diode cutter, you can access the design without needing complex conversion tools. The files are fully scalable, meaning you can adjust the dimensions to fit standard photo sizes such as 4x6, 5x7, or even larger formats, depending on your material sheet size and preference.
Design Features and Customization Options
The flexibility of the Daddy Grinch Photo Frame is one of its most compelling attributes. The design is not a one-size-fits-all solution; instead, it offers multiple layout options to suit your specific needs. You can choose from 1, 2, 3, or 6 photo layouts. This modularity allows you to create a single focal point for a standout portrait or a collage style that captures a series of moments from a single holiday gathering.
The layered components are meticulously organized to facilitate assembly. The package includes separate layers for the backer, the frame mat, and the decorative accents such as the “Santa squad,” tree, and star. Additionally, optional score and engrave lines are included, allowing you to add texture and detail to the wood or paper surfaces. This attention to detail ensures that the final product looks polished and professional.
Color-Coding for Precision
For laser cutter users, particularly those utilizing LightBurn, the design employs a intuitive color-coding system. This feature significantly reduces the risk of error during the cutting process:
- Red Lines: Indicate cut paths. The laser will cut completely through the material along these lines.
- Blue Lines: Represent score lines. These are shallow cuts or creases that allow for folding or bending, essential for certain assembly techniques or adding dimension.
- Black Areas: Denote engraving zones. The laser will etch the surface here, creating contrast and detail without cutting through.
This system helps beginners understand the logic behind laser operations while saving experienced users time by eliminating the need to manually assign operations to each vector path.
Step-by-Step Assembly and Best Practices
Creating your Daddy Grinch Shadow Box is a straightforward process, but attention to detail yields the best results. Here is a general guide to help you navigate the project from digital file to physical decor.
1. Material Selection and Testing
The design is tested for 3 mm plywood, which provides a sturdy base and a warm, natural aesthetic. However, you can experiment with cardstock for a lighter, paper-craft version, or acrylic for a modern, glossy look. Crucially, always run a material test first. Laser settings vary significantly between machines due to differences in lens quality, wattage, and age. A small test cut will help you determine the optimal power and speed settings to ensure clean cuts without charring.
2. Cutting and Engraving
Load your chosen material into your machine. If using the LBRN2 file, the settings should be pre-loaded, but verify them against your test results. For Cricut or Silhouette users, ensure your blade is sharp and the pressure settings are adjusted for the thickness of your material. Take care to keep the material flat to prevent misalignment during cutting.
3. Preparation of Components
Once cutting is complete, carefully remove the pieces from the matrix. Use a soft brush to remove any soot or debris from engraved areas. If you have chosen to include score lines, gently fold along these marks to prepare the pieces for assembly. Sanding any rough edges with fine-grit sandpaper can enhance the final finish.
4. Assembly
Begin with the backer board. Apply a thin, even layer of wood glue or craft adhesive to the contact points of the first layer. Align the frame mat carefully, ensuring that the photo openings are centered. Continue stacking the layers, adding the decorative accents like the tree and star last. Use clamps or heavy books to hold the layers together while the glue dries. This ensures a tight bond and prevents shifting.
5. Inserting Photos
Once the frame is fully assembled and dry, insert your chosen photographs. The layered design creates a natural recess where photos can sit securely. You may choose to use acid-free tape to secure them in place if desired.
Common Misconceptions and Tips for Success
A common misunderstanding among beginners is that digital downloads include physical materials. It is important to note that this is a digital download only; no physical product, photos, or mockups are included. You must source your own materials. Additionally, while the design is scalable, extreme resizing may require adjustments to line thicknesses to maintain structural integrity.
Another tip is to consider the lighting in your display area. Shadow boxes rely on depth, so placing them in a spot with ambient light can highlight the 3D layers. Avoid direct sunlight, which can fade photographs and warp wood over time.
Conclusion
The Daddy Grinch Photo Frame Shadow Box is more than just a holiday craft; it is a celebration of memory and creativity. By combining accessible technology with thoughtful design, it allows anyone to create a personalized piece of art that captures the spirit of the season. Whether you are looking to gift a unique keepsake or decorate your own home, this project offers a rewarding experience that bridges the gap between digital precision and handmade charm. With the right materials and a bit of patience, you can transform simple sheets of wood or paper into a lasting tribute to your favorite Christmas memories.