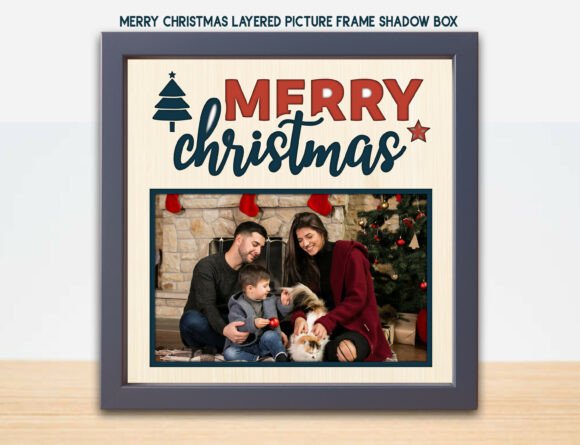
Christmas Crew Photo Frame Shadow Guide
Holiday memories deserve more than a spot buried in a digital cloud or tucked away in a shoebox. The Christmas Crew Photo Frame Shadow offers a tangible, artistic way to celebrate the people who make the season special. This project is not just about displaying a photograph; it is about creating a layered piece of decor that adds depth and warmth to your home. Whether you are a seasoned maker with a laser cutter or a hobbyist using a cutting machine, this design bridges the gap between professional craftsmanship and accessible DIY fun.
At its core, this shadow box project transforms flat images into three-dimensional art. By stacking separate layers of material, you create a sense of depth that draws the eye in. The design features charming accents like a "Santa squad," festive trees, and stars that frame your chosen photos beautifully. It is a perfect blend of nostalgia and modern making, allowing you to curate memories from Christmases past into a cohesive display piece.
Why Choose a Layered Shadow Box Design?
Traditional photo frames often feel static. A layered shadow box, however, introduces texture and dimension. The Christmas Crew Photo Frame Shadow utilizes a multi-layer approach where each cut piece sits slightly above the next. This technique creates natural shadows between the layers, enhancing the visual appeal without requiring complex painting or finishing skills.
For beginners, this project is surprisingly forgiving. The files are designed with precision, meaning the pieces fit together logically. You do not need to be an expert carpenter or designer to achieve a polished look. The value lies in the customization. You can choose from layouts featuring one, two, three, or six photos. This flexibility means you can highlight a single standout family portrait or create a collage of candid moments from a holiday party.
Moreover, the materials used are typically affordable and easy to source. Most makers use 3 mm plywood, which is widely available and cuts cleanly on most machines. The result is a rustic yet refined aesthetic that fits seamlessly into various interior design styles, from farmhouse chic to modern minimalist.
Compatibility and Technical Ease
One of the strongest advantages of this digital download is its broad compatibility. Whether you own a Glowforge®, xTool®, or OMTech laser cutter, the files are ready to use. The inclusion of an LBRN2 project file is particularly helpful for LightBurn users, as it comes pre-configured with color-coded settings. Red lines indicate cuts, blue lines denote scores, and black areas are set for engraving. This eliminates the guesswork often associated with setting up new projects.
If you do not have a laser cutter, do not worry. The package includes SVG, DXF, PDF, and EPS files, making it fully compatible with Cricut® and Silhouette® machines. While these machines may require you to cut thicker materials in multiple passes or use specific blade settings, the vector paths ensure clean edges. The scalable nature of the files allows you to adjust the dimensions to fit your preferred photo size or the constraints of your machine’s bed.
It is important to note that this is a digital product. No physical items are shipped. You will receive the design files and a simple assembly guide PDF. Photos and mockups shown in previews are for illustration purposes only and are not included. Always run a material test before committing to your final piece, as power and speed settings can vary significantly between different machines and even between batches of wood.
Creative Uses Beyond Home Decor
While many creators make this frame for their own living rooms, the Christmas Crew Photo Frame Shadow has significant potential for small business owners and entrepreneurs. Handmade holiday decor is a high-demand niche during the fourth quarter. Because the design is scalable and customizable, you can offer personalized versions to clients. Imagine offering a service where customers send their favorite family photos, and you produce a custom-framed shadow box as a premium gift item.
Educators and community leaders can also utilize this project. It serves as an excellent group activity for workshops, teaching participants about layering, design balance, and machine operation. The "Santa squad" theme is inclusive and fun, appealing to both children and adults. For bloggers and marketers, documenting the creation process provides engaging content. Time-lapse videos of the laser cutting process or step-by-step assembly tutorials can drive traffic and engagement on social media platforms.
Freelancers might use this as a portfolio piece to demonstrate their ability to handle complex layered designs. It shows proficiency in file preparation, material selection, and finishing techniques. The professional look of the final product speaks volumes about your attention to detail.
Practical Tips for Assembly and Finishing
Success with this project relies on careful preparation and patience during assembly. Here are some practical observations to ensure your Christmas Crew Photo Frame Shadow looks its best:
- Material Selection: Use high-quality 3 mm plywood with minimal knots in the areas that will be visible. Birch plywood is a popular choice for its light color and smooth grain, which takes stain or paint well if you choose to finish it.
- Clean Up Edges: Laser cutting can leave slight charring or soot on the edges. Use a soft brush or fine-grit sandpaper to gently clean the pieces before assembly. This step makes a huge difference in the final presentation.
- Adhesive Choice: Wood glue works well for a permanent bond, but it requires clamping time. For faster assembly, especially when working with small accents like the star and tree pieces, a strong craft glue or hot glue gun can be effective. Just be careful not to use too much, as excess glue can seep out and mar the surface.
- Photo Placement: Print your photos on high-quality photo paper or cardstock. Ensure they are trimmed precisely to fit the mat openings. If you want a more archival quality, consider using acid-free adhesive squares to mount the photos to the backer layer.
- Layer Order: Follow the provided assembly guide closely. Typically, you will start with the backer board, add the photo mats, place the photos, and then stack the decorative foreground layers. Taking your time to align each layer ensures the 3D effect is symmetrical and pleasing.
Considerations Before You Start
Before diving into this project, consider your workspace and tools. Laser cutting produces smoke and fumes, so proper ventilation is essential. If you are using a diode laser, ensure you have appropriate eye protection. For those using cutting machines, make sure your mats are clean and sticky enough to hold the material securely during intricate cuts.
Also, think about the lighting where the frame will be displayed. The layered design creates shadows, so placing the frame in a spot with ambient light can enhance the 3D effect. Avoid direct sunlight, which can fade photos over time and potentially warp the wood.
The Christmas Crew Photo Frame Shadow is more than a craft project; it is a way to preserve and honor connections. It turns fleeting moments into lasting artifacts. Whether you are making one for your mantle or ten for holiday gifts, the process is rewarding, and the result is a cherished keepsake that captures the spirit of the season.